
Backblaze is a popular offsite storage location for website backups due to it’s consistently low pay-as-you-go storage fees. In fact, we recently recommended creating a WordPress backup with Backblaze for this very reason.
XCloner has long-supported creating WordPress backups with Backblaze. Access to Backblaze has always been through the use of API keys or application keys as they are referred to by Backblaze. Critically, prior versions of XCloner required the master application key — the main API key of the Backblaze account holder.
Using the master key for multiple purposes is problematic. Generally speaking it is considered less secure than generating a set of individual keys for each unique purpose.
For example, a web developer might use an individual key for each website they are backing up. This keeps the master key private. It also allows individual keys to be revoked as needed without affecting the other keys/websites.
In XCloner 4.2.10 we introduced the ability to use individual application keys from Backblaze. Below we’ll quickly review the process of generating an application key and creating WordPress backups with Backblaze and XCloner.
Generate an application key at Backblaze
- Log into your BackBlaze account.
- From the menu at the left, select
App Keys. - Click the
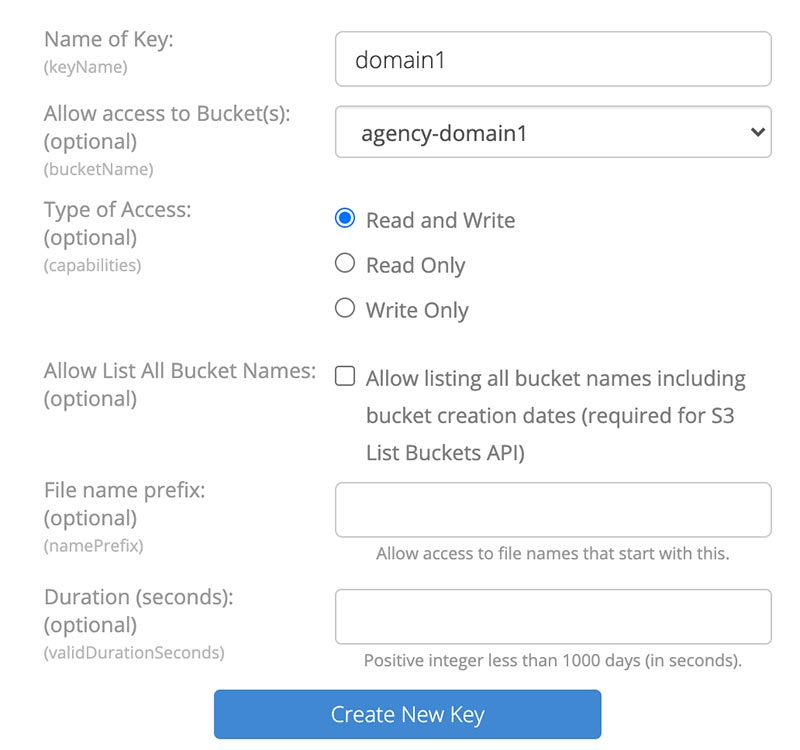
Add New Application Keybutton below the existingMaster Application Key. - Complete the form as shown below and click the
Create New Keybutton. - Note the
bucket,keyID, andapplicationKey.- Note: The latter will not be shown again and will need to be recreated if you fail to record it.
- Repeat this process for as many sites as you have.
application key in Backblaze.Configuring WordPress backups with Backblaze
- Log into your WordPress backend.
- In the
Pluginarea, update XCloner to the latest version. - Locate the
Site Backupitem in the admin menu at the left and selectStorage Locations > Backblaze B2 Storage. - Enter the
keyID,applicationKeyandbucketdetails you noted above (see preview below). - Select the
Verifybutton to ensure that Backblaze is properly configured and then finalize the process with theSave Settingsbutton.

Creating WordPress backups with Backblaze
Now that your site is configured, you can conveniently send any backup to Backblaze.
- Select
Site Backup > Generate Backupsfrom the admin menu. - In the
Backup Optionsarea, locate theSend to Remote Storagefield and selectBackblaze. - Complete the remaining details of the backup, select the
Start Backupbutton and wait for the process to complete. Ensure that the upload to Backblaze completes as expected. - (Optional) Click the
Schedule Backuptab, complete the details, and select theSave Schedulebutton. This creates a working backup profile for Backblaze. - (Optional) Once saved, XCloner backup profiles can be used to create regular backups in a variety of ways:
- You can set the schedule directly in the profile.
- You can run the backup from the command line using the WP-CLI or the XCloner CLI.
Full details on creating WordPress backups with XCloner are also available in our documentation.